Showing posts with label homemaking. Show all posts

7.07.2015

Lauren Hearts Lavender Chocolate Cupcakes!

You may have noticed that the cupcake department has been somewhat quiet around here lately.  No, we are not throwing in the towel on our grand scheme of filling the year with cupcakes, but "busy" doesn't quite do justice to the last two months: running a half marathon in California, running 5ks in Washington in California-worthy weather, setting off fireworks, helping run a week long music camp, eagerly anticipating a niece or nephew's imminent arrival, enjoying time with Mikaela and Joel while they were here on a visit, finishing good books, teaching, and trying to get my life organized.  You know how it goes.

But Sunday afternoon found me in the kitchen once again, with another grand slam of a cupcake!  This one is so good that it is rivaled only by my very first foray into the world of cupcakes--my double peanut butter chocolate cupcakes.  If you observe the coincidence that both of my top favorite cupcakes involve chocolate, then you have noticed a very important trait of mine: I LOVE chocolate!

My love for chocolate is only equaled by my love for all things floral, which is why Sarah, Mikaela, and I knew we had to have an entire category dedicated to floral cupcakes.  And let me tell you what, these lavender cupcakes taste like a big mug of frothy lavender hot chocolate in cupcake form.  What could be better?
I started off with a basic gluten free chocolate cupcake recipe featuring coconut flour 
and farm-fresh eggs!

Sarah inspired me to use my favorite measuring cup set--why don't all measuring cups come in the form of a nesting matroyshka doll?  They range in size from a cup to a pinch, and I'm sure they contributed to the tastiness of this recipe!


 Olive oil and honey make these cupcakes moist and delicious! 

I added just one drop of Mama's Young Living Lavender essential oil, and it gave the perfect hint of lavender flavor to the cupcakes. 

Fresh out of the oven, and begging to be stuffed in my mouth!  This is the point at which I begin to doubt the necessity of frosting, but I stayed strong.

If you remember Mikaela's rave reviews of the German Buttercream frosting she made in April, you know why I decided I had to try that frosting for myself!  I started with dried lavender...the best flavoring in the world!

Simmer the lavender with milk, and let it steep for ten minutes, then inhale the lavender deliciousness.

Next comes the sunny yellow yolks, sugar, vanilla, and lots of stirring and butter.  And I'm afraid I have to agree with Mikaela: this is the best stuff in the world!  I found it thickened more quickly than hers did (perhaps because I had my burner on medium low, or perhaps because I only made one recipe.)  In any case, the ratio of difficulty to deliciousness was quite good!  

Now...get ready, set, frost! {And I promise, the frosting is more purple in person!}

Not a crumb was left behind from this beauty!

Let me know if you make these cupcakes, and what your opinion is on floral flavors in general!


Chocolate Lavender Cupcakes 
with Lavender German Buttercream Frosting
{Adapted from Elana Amsterdam's Gluten Free Cupcakes}
1/4 cup coconut flour
1/4 cup unsweetened cocoa powder
1/4 teaspoon sea salt
1/2 teaspoon baking soda
4 large eggs
1/4 olive oil or grapeseed oil
1/2 cup honey or agave nectar
1 drop food grade lavender essential oil

Preheat the oven to 350 F.  Line 9 muffin cups with paper liners.
In a large bowl, combine the coconut flour, cocoa powder, salt, and baking soda.  In a medium bowl, whisk together the eggs, olive oil, honey, and essential oil.  Blend the wet ingredients into the coconut flour mixture with a handheld mixer until thoroughly combined.
Scoop 1/4 cup of batter into each prepared muffin cup.
Bake for 18 to 22 minutes, until a toothpick inserted into the center of a cupcake comes out with just a few moist crumbs attached.  Let the cupcakes cool in the pan for 1 hour, then frost and serve.

Lavender German Buttercream Frosting
Adapted from The Tough Cookie

150ml milk 
1 teaspoon dried lavender
50g (or ¼ cup) granulated sugar 
1 teaspoon vanilla extract 
1 teaspoon cornstarch 
3 egg yolks 
50g (or ¼ cup) granulated sugar 
200g (or ¾ cup + 2 tablespoons) unsalted butter, at room temperature

 1.  Mix milk with lavender in a medium saucepan and heat just to a simmer.  Remove from heat and allow to steep for 10 to 15 minutes, depending upon taste, and then strain the lavender from the milk.

2.  Make a simple custard. In a small saucepan, combine the milk, 50g of sugar and the vanilla. In a heatproof bowl, combine the cornstarch with a little splash of the milk mixture. Stir to a smooth paste. Add another splash of milk an stir to incorporate. Whisk in the egg yolks and sugar until frothy and well combined; set aside. Gently heat milk/sugar/vanilla mixture over low heat, stirring occasionally. Once the milk mixture has reached boiling point and bubbles start to appear around the edges of the pan, slowly drizzle the hot milk into the egg mixture, whisking continuously. Once all the milk has been added, pour the mixture back into the saucepan and heat over low heat. Whisking continuously, wait until the first bubbles appear and the mixture has thickened. Pour into a clean heatproof bowl and place a piece of plastic wrap directly onto the surface of the custard to prevent a skin from forming. Allow to cool to body temperature (set bowl in cold water to hasten cooling process). 

3.  Once the custard has cooled sufficiently, mix in the butter, 1 tablespoon at a time, waiting until each tablespoon of butter is incorporated before adding the next. Use immediately or cover with plastic wrap and place in the fridge until needed. Store in the fridge for up to 1 week or for up to 2 months in the freezer in a freeze­proof container or bag.

4. To use buttercream that has been refrigerated, allow to come to room temperature (this takes about 3 hours in a warm kitchen) or microwave in 30 second intervals, stirring in between each interval, until it's soft. Then mix through until it's spreadable again. Thaw frozen buttercream in the fridge overnight, then allow to come to room temperature before use and, once at room temperature, mix briefly until smooth. 

5.  Serve at room temperature. If you've assembled a cake or decorated cupcakes, allow cake or cupcakes to come to room temperature before serving (about 3 hours in a warm kitchen). 

Cupcake Party: Chocolate Edition

Lauren's Double Peanut Butter Chocolate
Sarah's Chocolate Chunk Lava Fudge
Mikaela's Hazelnut Mocha

Cupcake Party: Savory Edition

Lauren's Spinach Feta
Mikaela's Cupcakes & Croutons 
Sarah's Carrot Ginger Coconut Muffins 


10.15.2013

Making Beautiful Baubles

 
There's a lot of window shopping that goes on on Pinterest. Take for example the unique pair of crystal earrings that caught my eye; I loved the rough-cut quartz that looked both rustic and feminine at the same time. When I set out to find myself a pair, I discovered some beautiful amethyst varieties on Etsy...for only $20 (plus shipping and tax). Needless to say, the thought of paying over $20 for a whim did not appeal to me. But when I discovered exactly the type of amethyst gems I needed in a cute Portland shop for only a dollar apiece, I jumped at the opportunity to make my own earrings!

You can find amethysts for $1.05 apiece here, but you want to pick stones that are roughly the same size, so a more sensible (and economical choice) might be to purchase 1/2 lb (7-12 pieces)for $2.95 (these ones are also supposed to be smaller than the first choice, so note the measurements and decide what look you'd prefer).

 
While I was at it, I also gathered a pair of brown wooden buttons and crystal buttons. These cost me less than a dollar per pair! How perfect would this be to include in Christmas presents? You can find the earring posts at this link on Amazon or at any craft supply store.

 
E6000 Craft Adhesive--this stuff is the best for jewelry making!

 
This took me back to my kindergarten days--seriously, all you do is glue, place the posts, and wait patiently! If I was making another pair, I would place the posts in the upper half of the amethysts. Because the rocks have some weight to them, they can droop, but placing the post closer to the top would solve this problem.


Placing the posts in the middle of the buttons worked just fine though, since these were lightweight!


I'm experimenting now with fabric flower earrings, but haven't quite perfected my technique and gotten them the way I like them. It's just another fun possibility, though, to try out, since you now have that whole bag of earrings posts that need to be used!
 
Happy Crafting!


This blog post contains affiliate links. Purchasing through an affiliate link allows me to keep blogging and sharing what I learn with you. It is a bit like leaving a tip for service and is very much appreciated.

9.10.2013

The Pink Dress Challenge

 
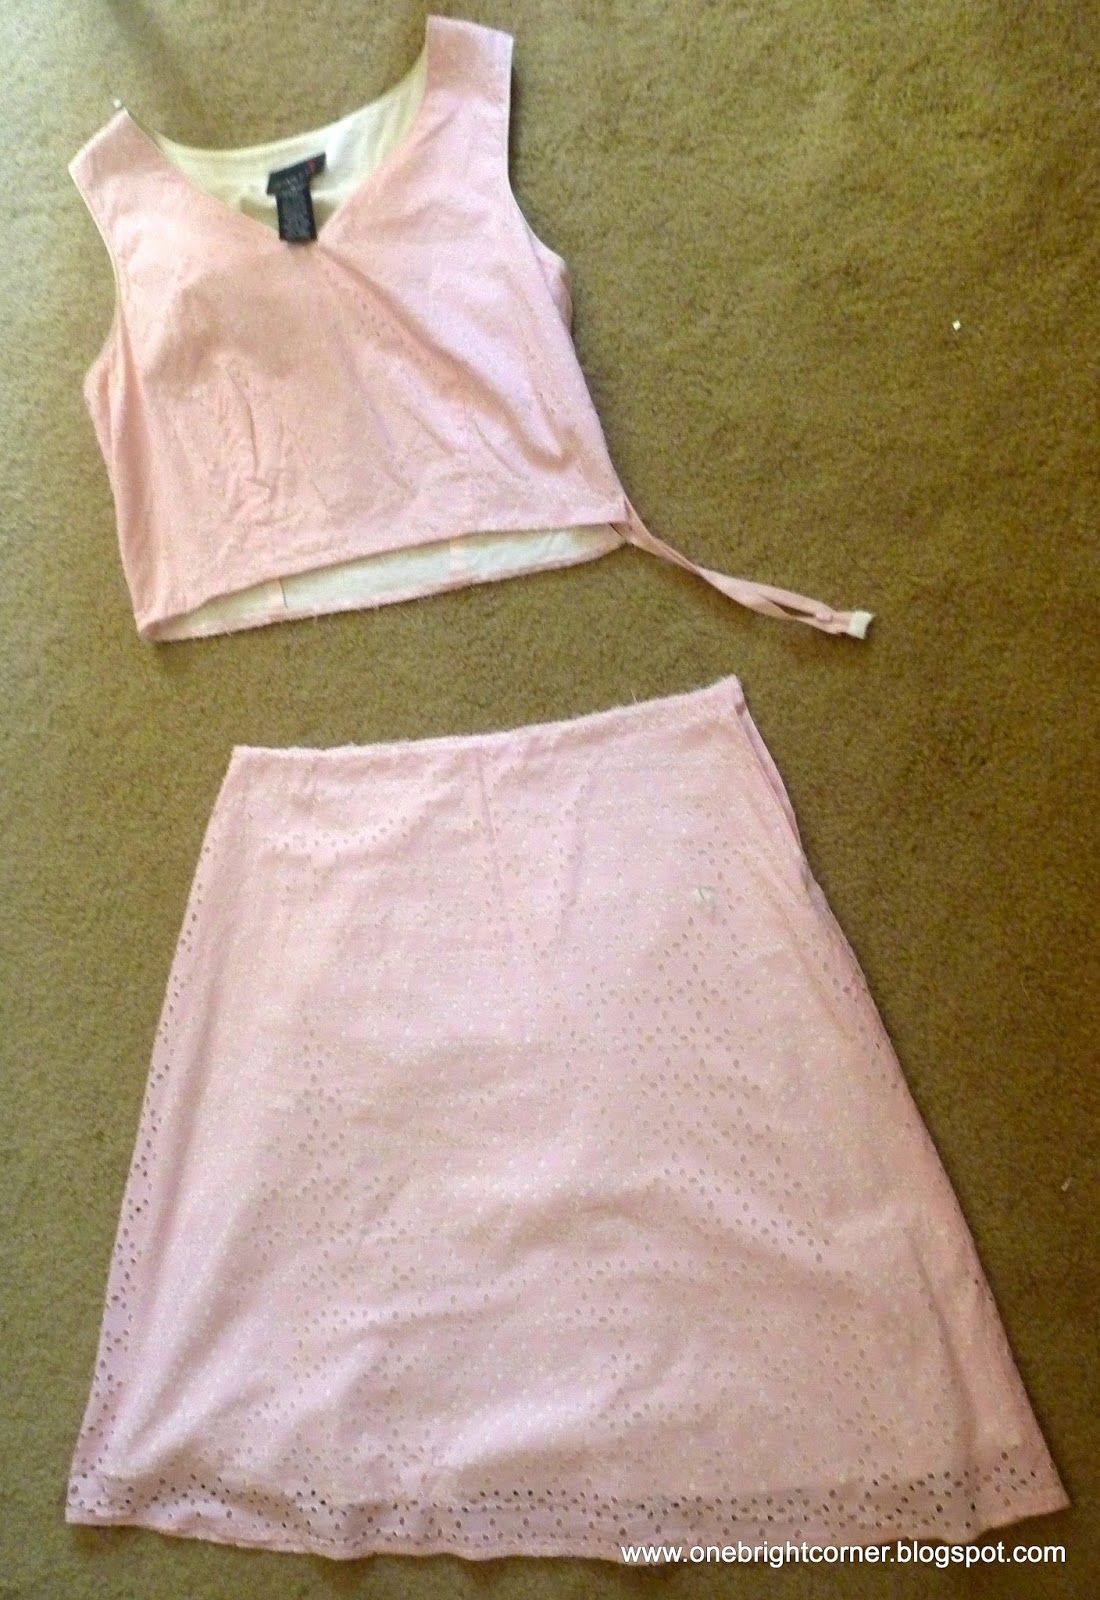
This pink dress, which is over seven years old, has languished in the corner of my closet for the last few years.  It had become a little too short, and didn't fit very well.  Furthermore, it was sleeveless, which isn't my preferred style and meant that I was always searching for a cardigan to go over it. 

The fabric, however, was beautiful, and enticed me to a challenge.  Could I make the dress over, resulting in a more modest, better fitting, yet still gorgeous outfit?
 
Thankfully, I had a secret weapon to help me out in my challenge: Mikaela had an identical dress (one of the many perks of having an identical twin sister!).  Hers, however, had been languishing in her closet even longer because it was several sizes too big for her.  With her permission and only a slight bit of trepidation, I ripped apart her dress and got busy!


Next, I cut a strip of fabric from the bottom of her dress to add length to the bottom of my dress.  However, as you can see in the top photo, I couldn't just add the strip on to the dress, because the bottom of the dress was wider than the top of my strip!  So I simply sewed up the side seams of my dress 1 1/2 inches on each side, gradually easing off before the hip area. 


Every challenge needs its challenging moments.  In the top photo, you can see my length addition sewed perfectly onto my dress.  Perfect, except that I later realized that the trim I wanted to add needed to be sewn into the seam!  So I ripped that whole seam out, and prepared to make the trim, which would hide the addition to the dress and serve as a stylish element as well. 
 
I wanted the trim to be an exact match for the trim found on the waist of the dress, but wasn't sure where I could get that same white fabric.  Amazingly, I didn't have to look any farther than the lining of the dress--perfect match! 
 
I simply cut several strips of the white lining on the bias, sewed them together into one long strip, folded them in half lengthwise, and sewed a quick seam to hold it in place.  Next, I pinned the trim to the bottom edge of my dress, and then the addition (right sides together) on top of that.  One more seam, and the skirt was done!

 
I also had to add an addition to the lining, since the eyelet fabric addition would be see-through without it.  So I cut more fabric from Mikaela's dress lining and followed the same steps as above to add the required length. 
 
 
Next up: I decided to tackle cap sleeves, without a pattern!  First, I googled.  Second, I had to sew up the center seams of the straps to adjust the bodice fit.  Then, I measured around my upper arm, and cut two rectangles of fabric about an inch shorter than that measurement (since I didn't need the sleeve to go all the way around).  I made my sleeves about 4 inches wide, but they could be even wider.   

In the middle photo above, I sewed the eyelet to the lining wrong sides together, turned it right-side out, top-stitched, and had a beautiful finished sleeve edge!  I finished the other edges by zig-zagging them, then trimming them. 
Next, I folded the sleeve in half and held it up to the armhole of the dress.  I traced that curve along the sleeve, and cut it out to end up with the half-moon shaped piece in the upper right. 
 
I then gathered the zig-zagged edges, pinned them into the armhole, and sewed them up (and tore out the weird gathers and tucks that I always manage to sew over). 

 
Finally, I wanted to create a few flowers to add the last touch of elegance to the dress.  I decided to try out a new technique I had seen on Pinterest, which turned out quite wonderfully!  You simply trace a disc on a piece of fabric, then cut the circle in a spiral shape.  I found that rolling the first few inches to form a loose bud, then randomly gathering the rest of the length to form petals worked beautifully!
 
 A cluster of posies adorns the waist.

 
My finished pink dress!  Challenge met!
 
 Even though that trim required seam-ripping, it was worth it! 
 
 The dress made its debut only a few days after completion at my dear cousin's wedding.  Here I'm on the left getting in on the bouquet toss!
 

Next week, Mikaela will have more from the wedding to share with you all!  But for now, although my room is still strewn with pins and pink threads, I love my "new" dress and know one thing for sure: it will not be a closet languisher in the future!

7.30.2013

High School...Then What?


Photo Credit

Six months before I graduated from high school, when I had no plan, I felt as though I were racing at Eric Liddell speed for a giant ravine.  When the day came, I’d hold my breath, take a leap, and hope I made it across! 
 
Yesterday afternoon, five years later, I opened up an old hunter green composition book in which I printed in blue ink, “Life after High School.”  I still remember brainstorming the list, trying to think of every possible avenue to which the Lord might want me to give a wedge of time after I graduated.  Reading over it, I see a lot of opportunies I have completed, a lot of choices I still need to make, and a lot of options the Lord has recently brought that I never dreamed of at the time I wrote the list. 
 
Before I give my (updated) list, a few caveats:
·                     There is no human way to accomplish all of this.  Don’t try to stuff the ravine of the unknown with filler as a way to bridge the gap.  If a few ideas stand out to you, pray about them and bring them to your parents before cramming everything in.
·                     There is one noticeable exception to this list: college.  But I decided that was the old stand-by that everyone would write, so at 18 I left it off.  I still like that logic. 
·                     Be creative.  Just because you desire to stay under your parents’ authority doesn’t mean your list or life will look like mine!  This is just a compilation of a few ideas to get you started and productive. 
 

The List

1.      Memorize the Bible. (1 John, Psalm 119, etc.)
2.      Read at least one nonfiction book a month and write a report.
3.      Bake bread.
4.      Write a book.
5.      Help siblings with school.
6.      Advance in music.
7.      Teach music.
8.      Grow in character. 
9.      Be a servant.
10.  Help other mothers and learn from them.
11.  Put budgeting, buying, and making food into practice.
12.  Garden.
13.  Learn about car maintenance.
14.  Study and delineate Biblical guidelines on marriage, childrearing, and other relevant topics.
15.  Be a helper to my father.  Be a helper to my mother in practice to be a homemaker.
16.  Spend more time in prayer.
17.  Visit nursing homes.
18.  Be ready to defend my faith.
19.  Review First Aid.
20.  Study and apply So Much More.
21.  Write music.
22.  Sew
23.  Work on relationships with my siblings.
24.  Exercise.
25.  Develop other spiritual gift qualities.
26.  Work with a local homeschooling ministry.
27.  Blog!
28.  Look for ways to minister to other girls.
29.  Learn about natural health.
30.  Seek a mentor in an older woman.
 

Morsels to Digest


As a girl wanting to buck the world's status quo, don't get caught up in using your time, but do redeem it.

Don't find fulfillment in filling your schedule, but do be filled with the Holy Spirit and God's mission for you.

Don't measure your worth by your activity, but do judge your diligence by your habits.

It is a constant prayer of mine to be a productive, fruit-bearing woman of God, and I will be praying that for each one of you, no matter what season of life you are in!

What do you have to add to The List? 
 

“worldwide directions" © 2006 Andrea DM. Used under a Creative Commons Attribution-Noncommercial license: http://creativecommons.org/licenses/by-nc/3.0/.

11.20.2012

Zippered Pouch Tutorial

 
Is it too early to talk about Christmas gifts? I generally operate under the principle that the Christmas season does not commence until the day after Thanksgiving, except where music and gift preparations are concerned. And seeing as how I've been teaching Christmas music since July, and playing it since October, I do believe it is high time to get working on some Christmas gifts! For 2012 birthdays, I gifted many of my family members with a handmade zippered pouch, just the right size to hold and protect their fragile booklights. These pouch sizes can be adjusted to hold just about anything, from cell phones to ipads to laptops to coins to make-up. How fun would it be to whip up a couple of these for Christmas and embellish them with only your own creativity and the moon as the limit?

 
(Those two small rectangles pictured above with the four big ones? Ignore them. You don't need 'em. They were drafted for a embellishment idea I had that failed miserably.)
 
Materials:
 
Outer fabric (I used synthetic leather, fashion denim, and home decor linen for my three different styles. Try to pick something with some weight and stiffness to it.): 2 pieces 9" x 7-3/4"
 
Lining (I used fleece to cushion and protect): 2 pieces 9" x 7-3/4"
 
1 zipper, cut to 9"
 
Optional Embellishments:
 
~Bow~
2 pieces 10" x 5.5"
1 piece 2" x 5"
 
~Pinked Edging~
(Used on the purple flowered pouch along the zipper)
2 Fleece pieces 9" x 1"


If you're doing the bow, pay attention! Otherwise, you get a free trip past "Go": you may collect $200 and move on to the next step.
 
Take your 2" x 5" rectangle and fold it in half lengthwise, right sides together. Sew along length with a 1/2" seam. Press seam and turn right side out.
 
Pin the two 10" x 5.5" rectancles, right sides together. Sew along the length of both sides with a 1/2" seam. Press seam and turn right side out.
 
Slide the ring over the rectangle and arrange until you have a satisfactory bow. Voila! Tack the ring and bow together by hand to keep the shape. Pin to the front rectangle piece of your outer fabric and baste together with a 1/2"seam.

 
Now it's time to make a fabric lasagna! Start with your outer fabric rectangle, right side facing up. If you're doing a pinked edging, place the 9"x 1" strip on top, keeping edges even. Next, place the zipper, halfway zipped, right side down, edges even, as shown. Top it all with the lining rectangle, right side down. See all those layers? You'll only have three if you're not doing the pinked edging. Pin everything together, taking care to keep the edges even.
 
Using your machine's zipper foot, sew a straight line along the zipper teeth. Feel for the zipper with your finger, or find a point of reference on your foot to keep a straight seam line that is as close as possible to the zipper teeth. When you reach the zipper fastener, lower the needle into the fabric, raise the foot, unzip the fastener out of the way, lower the foot, and continue upon your merry way!


Once you've finished, your creation should look something like the first five pictures in this set. If it bears no resemblance, I suggest you start looking for your seam ripper, a different gift idea, or better teacher.
 
Starting with picture six of the above set, you can see the visual for creating the fabric lasagna for the other side of the pouch. You're going to flip the previously sewn fabrics right side out to get them out of the way, and then lay your unsewn outer fabric face up. Upon that, place the other 9" x 1" strip (if you're doing the pinked edge option), the unsewn side of your zipper (face down), and your lining (face down). This pin and sew in the same manner as before.


Catching the vision? Now's a good time to perform a pleased happy dance at the beautiful results already taking shape! Here's where you'll pink those cute little strips to whatever width suits your fancy.

 
Topstich as closely as possible to the edge to create a lovely finished look and keep the fabric lasagna from shifting.

 
Unfurl your pouch as shown in the first picture, with right sides of the outer fabric together, and right sides of the lining togther. Simply sew along the perimeter with a 1/2" seam, leaving several inches open in the lining to turn the pouch right side out. Clip the corners and trim the seams and zipper bulk if necessary.
 
Are you ready? Truly and really?
 
Turn it right side out. And ladies and gentlemen: we have ourselves a pouch! (Not an authentic pouch, however, until you handsew that lining shut. Let's not get ahead of ourselves!)


This, you see, is the booklight for which these pouches were intended to hold and protect.

 
What will you put in yours?


Blog Widget by LinkWithin